
This post may contain affiliate links. If you use these links to buy something we may earn a small commission. Thanks.
Any adult should know how to start a gas grill. The appliance is just another type of a gas cooker, only that the burners are long tubes with many jet ports and the lid is a bit airtight. Thus, things can easily go wrong and you end up starting a disastrous fire.
But other than a high safety precaution measure, a gas grill is pretty straightforward to operate. You can light it up within seconds, which is way faster than when you use a charcoal grill that takes 5 – 60+ minutes.
In any case, this article covers a brief guide on how to start a gas grill properly and safely. But before we can come to that…
Make Sure Your Gas Grill Works Fine
Whether it’s a full-range or compact portable gas grill, the convenience is no doubt incomparable to the other types. But even then, the actual grilling experience does vary from one type of gas grill to another.
For instance, a high-end brand like Weber and Bull or Blaze offers a much better cooking convenience than the low-end options. Most of the inventions from these brands have a heavy-duty build that will last and various sophisticated features to help in cooking.
Among the said features, those that matter in lighting and keeping your gas grill lit include:
- Burners:
The burner is one of the most crucial components of any gas grill. It’s the heartbeat of the appliance, where it carries and distributes the heat/ flames across the cookbox. But, of course, the heat generated will vary with the nature of the burners.
For instance, a 6-burner gas grill may have the cookbox hotter than a three–burner Char-Broil or Broil King. The infrared burner also usually gets hot faster and sometimes higher than the traditional “blue flame” burners.
So, grills like Lion and Blaze that you can switch between the two types of burners can be very handy, especially if you love searing.
- Venturi tubes
Simply, these are the tubes that usually connect the burners of your grill to the gas supply from the front (on the control panel). But they feed the gas to the burners after mixing it with air to enhance ignition and produce the flame.
- Control Valves
The control valve is another crucial feature you should consider when learning how to start a gas grill. It’s the part that supplies and regulates the gas flow to the burners through the Venturi tubes.
The control valve of each burner usually has a locking feature, which you close or open by turning the knob. And as the traditional kitchen cooker, the grill requires you to push in the knob while turning ON to release this lock.
- Built-in Igniter
An igniter is also an important component in any type of gas grill. True, you can still be able to start your appliance without one, but it does make the whole process more convenient.
Nonetheless, we usually have two different types of gas grill igniters: an electronic or piezo igniter. What’s the difference between the two?
Well, the electronic igniter like that of Weber Q1200 and Q2200 creates the spark to light up burners using electronic-triggered electrical pulses. Thus, it’s more responsive and faster to light grill than the piezo igniter that relies on piezoelectricity to produce the electric spark.
Ps. The older Weber Q1000 and Q2000 are perfect examples of gas grills that rely on a piezo igniter.
- Gas Regulator & Hose
The gas regulator is also a vital player in the performance of your grill. It works by regulating the pressure and gas flow from the supply tank before reaching the burners. Otherwise, the pressure inside the tank is usually too much, and would be difficult to create a stable flame.
- Gas Tank
Last but not least, your gas grill can only work if the tank does have the “gas” to burn. On the BBQ day, you should always make sure the tank is full or rather have enough amount for the whole cooking session.
But the experience is much smoother with a gas grill like Weber Genesis II E-315 and E-335 that has an integrated fuel meter.
Step-by-Step Guide on How to Start a Gas Grill
At this point, I’m assuming you already have everything you need to grill at your work area. You should also have assembled the heat tamers (if available), inserted the grease drip pan into its place, and mounted the cooking grates.
If all that has been taken care of:
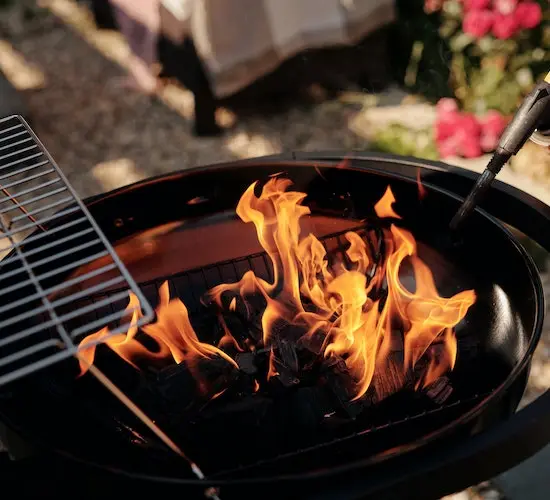
Step One: Open the Lid to Your Grill
Never should you turn on the burners of your gas grill while the lid is still closed. It can lead to a build-up of gas in the cookbox, which could then cause disastrous fire.
So, the very first step to start your cooker involves opening the hood. It will make sure the gas fumes escape into the air before you light.
Step Two: Connect the Gas Supply:
Check and make sure the gas supply of your grill is connected properly. If not, follow the instructions specific to your system (based on whether it’s natural or propane) and hook it up.
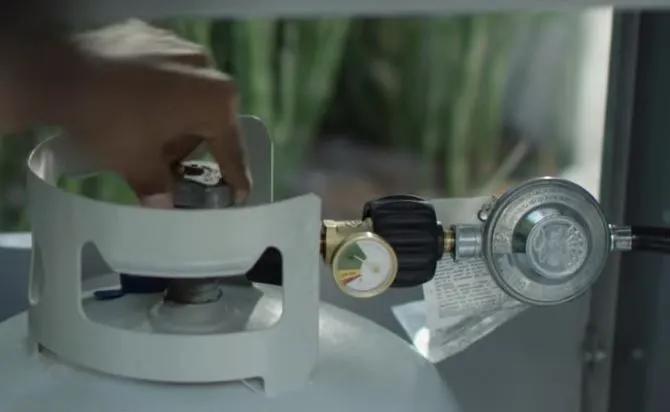
After connecting, turn on the regulator valve to release the gas into the grill. The control knobs should be off at the time.
Tip: Naturally, a gas grill will burn on either liquid propane or natural gas- not both. But you can purchase a conversion kit to convert your appliance from one to the other.
Step Three: Light up the Lead Burner
Once you have gas flow into your grill, turn on the control knob of the lead burner and press the ignition button. If you’re wondering, the lead burner is the one closest to the igniter for the spark. Otherwise, starting with the burner on the farther end will delay or won’t light up at all.
In case your grill doesn’t have a working igniter, you can light it manually with a long fireplace match or gas lighter. You can use the manual igniting hole on the side of the grill or through the grates (if there’s no igniter hole).
Step Four: Turn On the Rest of the Burners
Once the lead burn is lit, make sure its control knob is up to the highest level. Then turn on the rest of the burners to the maximum setting too.
Step Five: Close the Lid for Twenty
After you make sure all the burners are lit, close the lid. The idea here’s to preheat the grill to sanitize the cooking grates before you place your food. It also helps make sure your food cooks evenly and consistently, as well as minimize the issue of sticking.
If you have a gas grill with a lid-mounted thermometer, preheat the cookbox to 500-550°F. In case there’s no thermometer, leave your machine like that (with burners on and the lid closed) for about 15-20 minutes.
Step Six: Adjust your Desired Heat Level
When your grill gets warm enough, turn the control knobs down to your desired cooking level. The temperature readings will drop after you open the lid and put your food on the grates. But it should recover within a few minutes when you close the lid.
If cooking with indirect heat, the burner on the side you’ll put your food on should be completely off. For instance, you can turn off the middle burners when working with a 4-burner gas grill, leaving only those on the end.
Step Seven: Cook without interruptions
Different from charcoal grills, a gas grill will run at a consistent temperature throughout the entire cooking session. Once you have set your desired heat level, you can leave your food to cook. Then come and check later when it’s already done.
A perfect example would be when you cook ribs on a gas grill in foil with apple juice. You only need to set your cooker on medium heat, close the lid, and come back later after an hour.
Tip: On low-and-slow cook, avoid opening the lid to your grill in between as much as possible. Whenever you open the hood, your cookbox will have a noticeable drop in temperature, which will just delay your cooking.
Step Eight: Turn Off the Burners & Gas When Done
After hitting the desired cook time, turn off the burners to your gas grill and check if all the food has cooked properly. If it has, turns off the gas supply completely from the regulator valve.
Frequently Asked Questions
How do you ignite a gas grill with a lighter?
If the built-in ignition system has failed, you can easily ignite a gas grill with a lighter through a lighting hole on the side. And for those grills without the lighting hole, you can ignite the burner from the top through the cooking grates.
How do you manually light a Weber gas grill?
You can manually light a weber gas grill by switching on the gas, striking a matchstick (or gas lighter), and passing it through the cooking grates. If using a Weber Spirit, you only need to light one burner, then turn on the other burners. But for the Summit models, you may need to ignite each burner manually.
How do I start my outdoor grill?
You can easily start an outdoor gas grill by opening the lid, switching on the gas, and igniting the burners. Next close the lid, preheat the cookbox on high heat for about 15 minutes, then readjust the heat level and place your food on the grates.
When starting a gas grill what is the first step?
When starting any gas grill, the first step is usually to open the lid completely. It helps avoid a build-up of gas in the cookbox that would otherwise lead to a disastrous fire.
Troubleshooting if Need Be
Well, these are the key details on how to start a gas grill, regardless of the brand or design. It’s still a straightforward process if you ask me. But in case your cooker still doesn’t light up, chances are either or multiple of the features we mentioned are the problem.
For instance, the burners may fail to light up when the regulator has frozen or the hose/ venture tube has a blockage. The issue could also be a faulty control valve or ignition system. But all that we shall discuss later as a separate topic of its own.
